
|
IisDev |
|
Articles |
|
> Code Samples |
|
Components & Tools |
|
Service |
|
> Links |
Implementing a Guest Book Using ADO
One thing you're most likely to implement more than once in your career as a web page programmer is guest books. When your career already spans some years, then you might have implemented guest books using Perl or even CGI, or with Internet Information Server (IIS) using the Internet Database Connector, IDC.
With IIS 3.0 the new Active Server Pages (ASP) were added and enabled almost everyone to start programming cool, customized and data-driven web pages in next to no time. This article deals with the latter - getting database data live on the Web and also gathering data on a web page that is then inserted into a database.
Active Server Pages comes with Active Data Objects (ADO) that allow database access easy and fast. Before diving into the process of creating the guest book, I've provided a brief overview of ADO. Those already familiar with ADO can skip this section.
The Architecture of ADO
When you're used to working on Windows platforms for a longer time - two years or more - you will know ODBC (Open DataBase Connectivity) and might already have used it to connect to databases on local or remote machines.
So why is a new specification needed, namely ADO? ADO itself is built upon OLE DB and provides only a thin and efficient layer to OLE DB. OLE DB was developed to build upon COM (Component Object Model). If you are programming in an OLE environment, OLE DB is the best choice, because it also includes an OLE DB driver manager that enables OLE DB consumers to talk to ODBC providers very efficiently.
ADO eliminates unnecessary objects and optimizes tasks that were somehow complicated in DAO or RDO. Also, it exposes everything a data provider can do as well as adding extra value by creating shortcuts for common operations.
However, some data providers don't provide the same level of functionality as others. For example, SQL Server can provide stored procedures, others, like Microsoft Excel can't due to the limitations in their database functionality. ADO automatically adjusts itself to the provided functionality.
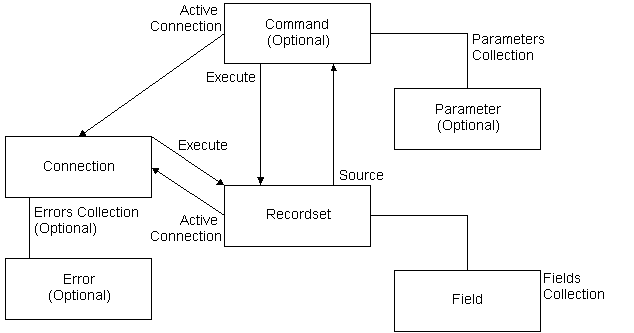
Figure 1 shows a diagram of how the objects provided by ADO relate to each other
Please notice that both the Errors collection and the Command object are optional. These, for example, are supported on the MS SQL Server, but not with Text-based files and others.
The relation between the objects shows how they fit together, however, each object with the exception of Field and Error can be created on its own. It is possible to open a Recordset without opening a Connection to the database first. This is done automatically when a Recordset is opened.
This diagram implies that there is no real hierarchy in the model - and this is true. You don't have to create a Connection before you can open a Recordset. With this flexibility, you can attach, for example, a Command object to Connection A and attach it later to Connection B without having to rewrite the query string or change parameters. Simply rerun the Command to create a Recordset.
Designing the Guest Book
Now that you know what power ADO offers to you, we can start designing the guest book. Two major parts comprise an electronic guest book: enabling the user to add an entry to the guest book, and presenting the entries that are already in the database to the users.
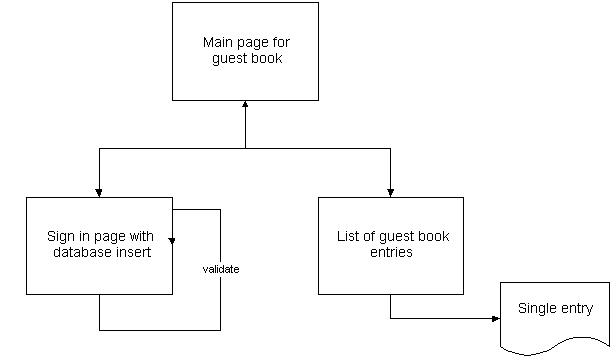
A schematic overview of a guest book implementation is presented in Figure 2.
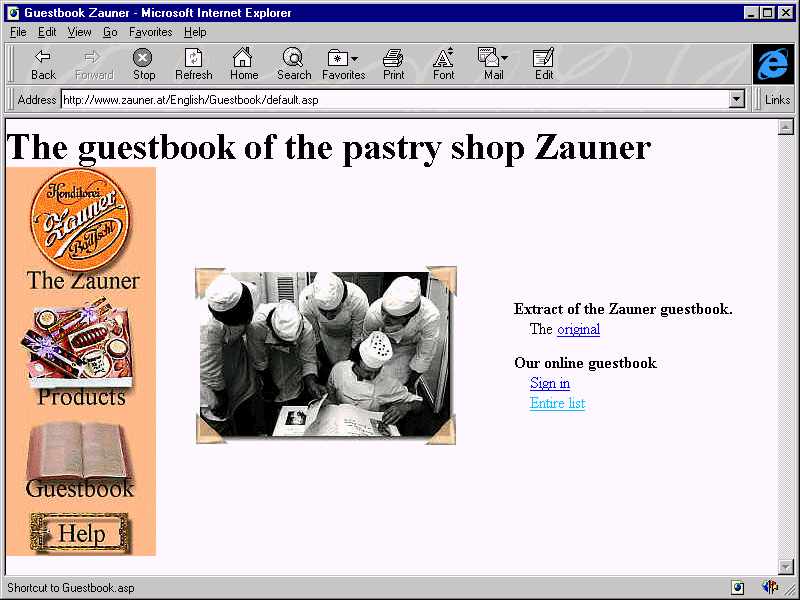
The main page of the guest book implementation could look like Figure 3 and contains links to a sign-in form and page that lists all guest book entries.
The sign-in form allows users to sign-in to the guest book. It contains all the logic needed to insert the user's entry to the guest book. Viewing of all entries in the guest book is implemented in the list of entries page. From the list of entries you can zoom in on a specific entry to view all the information that was provided by the user.
Implementing the Guest Book
The following list contains the information that is gathered by the guest book presented, and most of it can be considered standard guest book information:
- The guest’s name.
- Email address of the guest.
- Content rating (information and presentation).
- An opinion the guest can supply at his or her discretion.
- Internally, the date of the entry creation is stored in addition to the hostname of the guest’s computer.
Of course you can add more information if you would like to.
Preparing the Database
Although I always strongly recommend a dedicated database management system like Microsoft SQL Server 6.5 (because of superior performance), this guest book is implemented with a MS Access 97 database to store the guest book entries. These are stored in a table named tGuestbook, the definition for this table is presented in Table 1.
Table 1
Table definition for the tGuestbook table
| Column name | Datatype | Description |
| Id | AutoNumber | Primary key index |
| DateEntered | Date/Time | Date and time when this entry was created |
| Host | Text(15) | Client's host name/IP address |
| Browser | Text(64) | Client's browser identification |
| Name | Text(64) | Name of user signing the guest book |
| EMAddr | Text(64) | EMail address |
| IMark | Text(32) | Rating of information presented on your site |
| GMark | Text(32) | Rating of graphics design presented on your site |
| Notes | Memo | Any kind of comment from the user |
If you are using Microsoft Access to create the table, follow these easy steps (assuming you have Access 97 installed):
- Open Microsoft Access and select "Blank Database" in "Create new database using."
- Select guests as the database name and store it in a location to which the anonymous Web server user account has access (or when requiring explicit logon, all user accounts that are allowed to).
- Select Insert Table from the Insert menu. Select to view it in Design view.
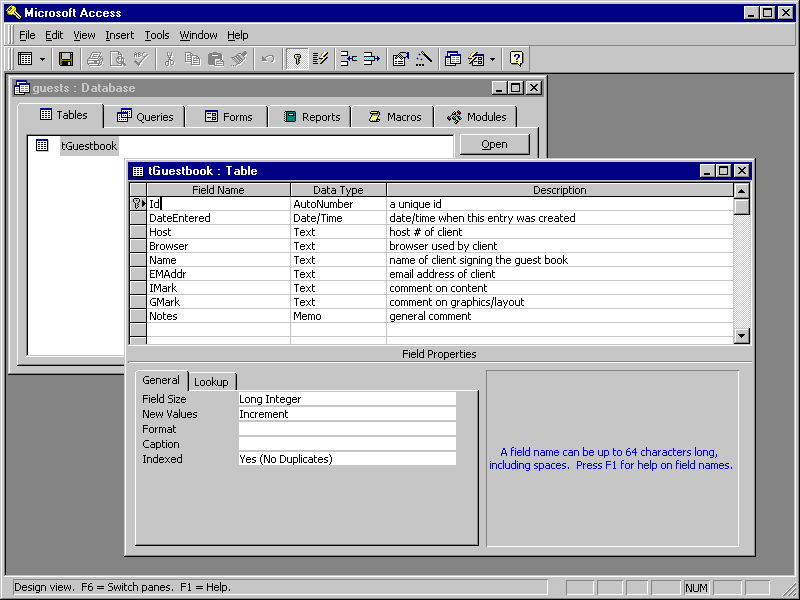
- Add all columns and set the Id column to AutoNumber and add the primary index to it. Save the table as tGuestbook. Figure 4 shows the table in Design View.
When you are storing the database to a directory that is located on a NTFS partition, then make sure that the user accounts have permissions to add/modify files in this directory, because DAO creates locking files when the database is first opened.
Now you have created the database and the table to store guest book entries. To be able to access the database from ADO and the Web server, you need to add a system data source from ODBC pointing to the Access database. Steps to create the system data source are as follows:
- Open the Control Panel on the server computer.
- Open the ODBC control panel application by double-clicking the ODBC icon.
- Switch to the System DSN tab and click Add.
- Select Microsoft Access as the driver for your new data source. Click Finish.
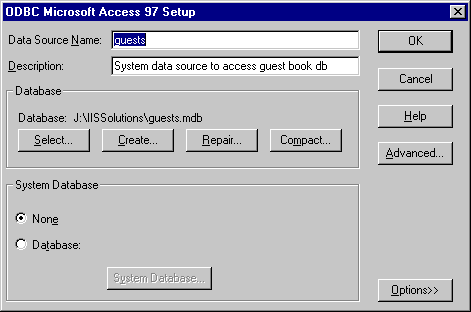
- The Microsoft Access 97 Setup dialog box opens. Select the database file in which you created the Events table. The completed dialog box should look like Figure 5, assuming that you have named the database and the data source guests.
- Click OK to add the newly created data source.
Now you're ready to start working with the database on the Web server using ADO!
Creating the Guest List Page
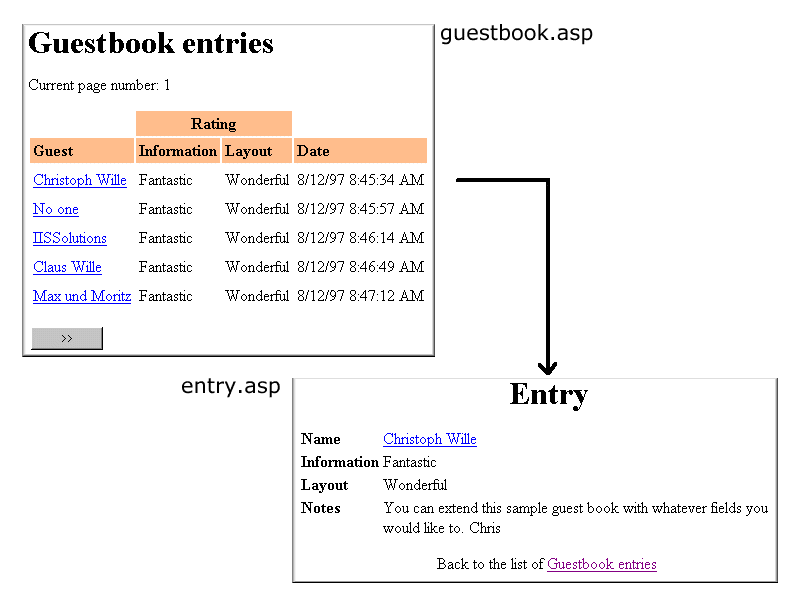
There are two goals to meet for viewing the entries: a list of entries containing only a subset of information stored for the entries and a second page that views all information for each single entry. Figure 6 shows screenshots of both pages and how they interact.
The guest book list page presented in Listing 1 uses a Session variable named "RS" to store the recordset for each user requesting this page for the first time. This is done to aid performance as only five records are presented on the page at once and further requests to this page use the stored recordset - no more round-trips to the database are needed. Notice that both the database connection object and the recordset object are created with calls to Server.CreateObject, however, you wouldn't need to create the Connection object - you could write
RS.ActiveConnection = "guests"
instead before opening the Recordset object.
There is one important code block in this listing checking with the Supports method for bookmarking capability of the current Recordset:
If RS.Supports(8192) Then
    '  bookmarks must be supported, like in SQL Server
    RS.AbsolutePage = nPageTo
Else
    RS.MoveFirst
    ' could be optimized (or rather should)
    RS.Move(nPageTo - 1) * nPageSize
End If
Recordsets that support bookmarks allow to jump directly to a specified page in the recordset (page size was specified to be 5 records), thus allowing paging through the recordset in a very simple fashion. The downside is that some database management system don't allow this, therefore a simpler (yet to optimize) algorithm is used to advance to the specified page.
The remaining part of the listing deals with creating the table of entries and adding paging buttons when appropriate. Please notice that you need to check for both end-of-recordset and maximum number of records per page:
If nRowCount = 0 And Not RS.EOF Then
For every entry in the guest book a hyperlink is created (with the unique Id from the tGuestbook table) which points to entry.asp presented in Listing 2. Besides a sanity check for the Id passed to the page, it mainly consists of code that is used to retrieve a single entry from the tGuestbook table. In contrast to the list page, a Command object is created and assigned the SQL command. Then, this Command object is used to fill the Recordset object with the results returned from executing this command. This page also shows that you should clean up all objects by setting them to Nothing.
Now that you have created pages for viewing entries, only one important part is missing: the page to allow clients to sign-in the guest book.
Sign-In Page
The sign-in page has to handle three different tasks:
- Present the user with a form where he or she can enter the guest book information (see Figure 7).
- Provide a validation page before the user's entry is inserted into the guest book with the option of going back and changing the information.
- A confirmation page after the user's entry was inserted into the guest book.
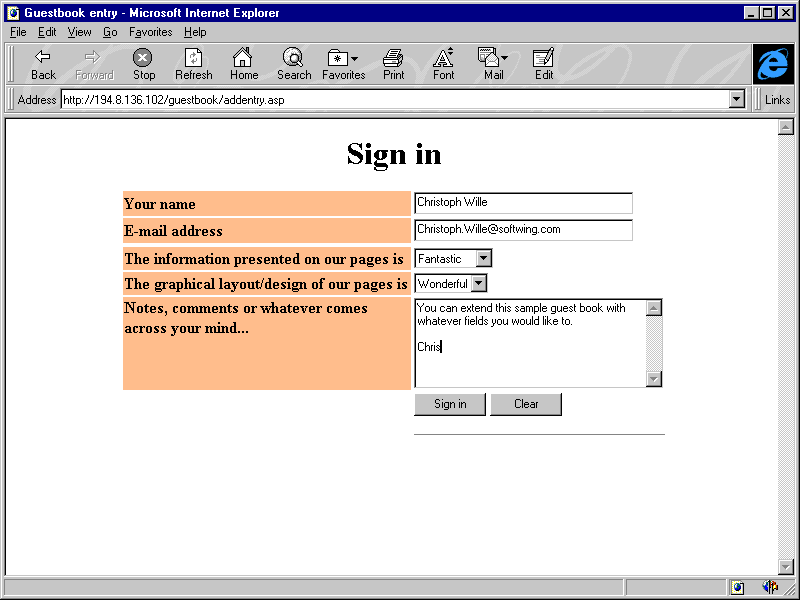
You could implement the form in a different page, however, for convenience, I have implemented all three tasks in a single page (see Listing 3). The form is presented whenever no data is passed to the page (refresh or something similar). Notice that the form data is passed via the POST method: I'd encourage you to use it as GET is deprecated in HTML 4.0.
A more interesting code block starts after the form, where a general error detection code is inserted that works for both the validation and confirmation/insertion page. Here you can check for validity of any field passed from the form and write errors back to the users if anything is missing; the implementation provided for this guest book requires the Name and the Email address to be supplied.
The validation page adds an additional field named "DoInsertFinally" to the form that is submitted to the confirmation/insertion page. This field is used to determine whether to present the validation page or the confirmation page when form data is received.
<% If (0 = Request.ServerVariables("CONTENT_LENGTH")) Then
…
If ("finalinsert" = Request("DoInsertFinally")) Then
Because there is nothing special about the validation page, I will discuss the database code that is used for inserting the guest's entry into the database in more detail.
Most lines are dedicated to creating a SQL string for an INSERT INTO statement. You could also create a Recordset and then use AddNew and Update methods, however, I wanted to demonstrate how to use the Command object to execute commands that don't return data (and of course this is faster as no data needs to returned as when using the Recordset approach). One of the interesting lines is of course
sql = sql & "{fn now()},"
This line inserts the current date and time to the database using the MS Access provided now() function. Very important in terms of hard-to-spot errors are the lines like the following for the guest's name:
sql = sql & "'" & Replace(strName,"'","''") & "',"
Strings are enclosed in apostrophes in SQL commands, however, someone could enter an apostrophe as part of her comment or even name. Therefore, to make the string a legal SQL command string, you have to replace all apostrophes with double apostrophes.
Also notice that the Memo field is added as last field and that I have set empty comments to contain the string "()". I have done this to avoid problems that arise out of Null memo fields and the necessity that memo fields must be the last ones in any SELECT or INSERT statement. When running into errors that seem to be illogical, check for the order of fields in your SQL statements.
Now the sign-in page is complete and the guest book implementation is nearly complete - only the main page is missing. However, I think that this is a challenge you'll surely master by yourself!
To download all the sample ASP files and the database you need, click here!